
Hiring? Flexiple helps you build your dream team of developers and designers.
Functional Reactive Programming using Swift

Saravanan V
Last updated on
This blog serves as a starting point for developers who have been practising imperative programming and are looking forward to jump into the Functional & Reactive programming world. It also exposes them to the power of combining both the approaches i.e. Functional Reactive Programming (FRP). The article should be good for beginners to kick-start with FRP while for experienced developers, there might be a few techniques you might not have applied so far. So, hop on to explore the FRP world.

Note that we will be using Swift language for our programs/ examples throughout the blog.
Table of Contents
- What is Functional Reactive Programming?
- What is Reactive Programming?
- Exploring RxSwift
- A word on RxCocoa
- Example – Login Screen Implementation
- Prerequisites
- What are we building?
- Project Setup
- Cocoapods Setup
- Import Dependencies
- Data Validation Extensions
- ViewModel Creation
- Controller Setup
- viewDidLoad Setup
- Conclusion
What is Functional Reactive Programming?
The Wikipedia definition for FRP goes like this:
Functional reactive programming (FRP) is a programming paradigm for reactive programming (asynchronous dataflow programming) using the building blocks of functional programming (e.g. map, reduce, filter)
Basically, Functional Reactive Programming (FRP), is simply a combination of Functional Programming and Reactive Programming. When using functional programming along with reactive, we mostly use Higher Order Functions (HOF’s) which is like an encapsulation layer hiding out the intricate details of any function’s operational sequences.
You will find it beneficial to go through our previous blog on Functional Programming first, as we are going to apply the concepts learnt there in our examples here. It is critical to understand functional programming concepts to follow along with this blog’s content and examples.
This covers the Functional programming part, so let’s cover the Reactive Programming now.
What is Reactive Programming?
A generic definition of Reactive Programming goes like this:
Reactive programming is an asynchronous programming paradigm oriented around data streams and the propagation of change. In this case, reactive programming allows changes to be modeled as they propagate through a circuit.
The definition could be further shortened simply like this:
Reactive programming is programming with asynchronous data streams
So, streams play a major role in the reactive programming world. Let’s then see what a stream is.
What is a Stream?
A stream is a sequence of ongoing events ordered in time. It can emit three different things: a value (of some type), an error, or a “completed” signal (which we will see in a bit). Consider the “completed” event that takes place, for instance, when the current window or view/ screen containing that button is closed. Touch events or text typing or any kind of user interaction or the change in the objects are really an asynchronous stream.
To put it simply, in the reactive programming world, consider that everything is a stream. Anything like variables, properties, data structures, etc, are streams just like system generated event streams from the user’s device inputs/ touches.
In Reactive programming, when we discuss streams, it is best conveyed with their representation in marble diagrams. For example, the below diagram itself explains a lot about the flow of a stream or ‘signal’, as some call it.

There are some amazing tools/ apps like RxJS Marbles (they also have iOS & Android apps), where you can learn Reactive programming concepts through an interactive experience by playing around with the marble diagrams. This is very helpful to understand the core concepts easily/ visually.
In the following sections, we will go through the basic concepts of Reactive programming by applying our learnings to a real-world example. We will be building a simple Signup/ Login screen. However, before that, let’s understand the basics of Reactive library for Swift, RxSwift.
Exploring RxSwift
There are 2 major Reactive libraries written in/ for Swift: Reactive Cocoa & RxSwift. We will be using RxSwift for our examples since it is the most popular reactive library for Swift.
Let’s look into some of RxSwift APIs/ concepts we would be using in our example.
(A) Observables
In RxSwift, streams are represented by Observable Sequences. Arrays, Strings or Dictionaries will be converted to observable sequences. You can create an observable sequence of any Object that conforms to the Sequence Protocol from the Swift Standard Library.
You subscribe to observable sequences by calling
subscribe(on:(Event<T>)-> ())The block passed in the method will receive all the events emitted by that sequence.
Let’s now try to create an Observable Sequence.
let heyThereSequence = Observable.of("Hey there!")
let subscription = heyThereSequence.subscribe { event in
  print(event)
}

Result:
next("Hey there!")
completed
Observable sequences can emit zero or more events over their lifetime. In RxSwift, an Event is just an Enumeration Type with 3 possible states:
.next(value: T) :
When a value or collection of values is added to an observable sequence it will send the next event to its subscribers as seen above. The associated value will contain the actual value from the sequence.
.error(error: Error) :
If an Error is encountered, a sequence will emit an error event. This will also terminate the sequence.
.completed :
If a sequence ends normally it sends a completed event to its subscribers.
Here’s a sample of how this looks like:
let heySequence = Observable.from(["H","e","y"])
let subscription = heySequence.subscribe { event in
  switch event {
      case .next(let value):
          print("onNext Event: \(value)")
      case .error(let error):
          print(error)
      case .completed:
          print("onCompleted")
  }
}

Result:
onNext Event: H
onNext Event: e
onNext Event: y
onCompleted
So far, we have seen what an Observable Sequence is and how we can subscribe to listen to the events emitted by it. What if we want to unsubscribe or cancel the subscription to the Observables? Let’s check this out in the next section.
(B) DisposeBag
‘DisposeBag’ in RxSwift helps you to unsubscribe from the Observable Sequences.
You can directly call ‘dispose()’ on a subscription object to unsubscribe. If you want to unsubscribe when the subscription object gets deallocated in ‘deinit()’ of the controller instance, you can create a ‘DisposeBag’ object and attach it to the subscription object using the ‘disposed(by:)’ method, which will unsubscribe automatically for you when the controller is dismissed/deallocated.
Just assume ‘DisposeBag’ as a garbage collector that cleans up all the unnecessary instances assigned to it in the app after its usage.
Here’s an example:
let disposeBag = DisposeBag()

let heySequence = Observable.from(["H","e","y"])
let subscription = heySequence.subscribe { event in
    switch event {
    case .next(let value):
        print("onNext, Event: \(value)")
    case .error(let error):
        print(error)
    case .completed:
        print("onCompleted")
    }
}
subscription.disposed(by: disposeBag)
(C) Subjects
Subjects are a different kind of Observable Sequence to which you can subscribe and add elements i.e. modify their content dynamically. There are various kinds of subjects in RxSwift, but we will be using only one type in our example called ‘BehaviourRelay’ (It was named as ‘Variable’ in < RxSwift 5.0).
This is a sample of how ‘BehaviorRelay’ could be utilized:
let disposeBag = DisposeBag()
//1
let behaviourRelay = BehaviorRelay<String>(value: "")
//2
let subscription1 = behaviourRelay.subscribe(onNext:{ string in
    print("subscription1: ", string)
})
//3
subscription1.disposed(by: disposeBag)
//4
// subscription1 receives these 2 events, subscription2 won't
behaviourRelay.accept("Hey")
behaviourRelay.accept("there")
//5
// subscription2 will not get "Hey" because it susbcribed later but "there" will be received as it was the last event
let subscription2 = behaviourRelay.subscribe(onNext:{ string in
    print("subscription2: ", string)
})
//6
subscription2.disposed(by: disposeBag)
//7
behaviourRelay.accept("Both Subscriptions receive this message")

Result:
subscription1:
subscription1:  Hey
subscription1:  there
subscription2:  there
subscription1:  Both Subscriptions receive this message
subscription2:  Both Subscriptions receive this message
Let’s walk through each statement and see what it does:
- Create a ‘behaviorRelay’ object of type ‘<String>’ with its default instance by providing a default value for it
- Then, create a ‘subscription1’ object by subscribing to the relay object
- Attach the DisposeBag object to subscription1, so that the observer gets deallocated along with the objects holding it.
- Using the ‘accept’ method, we emit the values to all observers of the ‘behaviorRelay’ observable. Hence, we are emitting 2 strings from here. Notice how ‘subscription1’ receives these emitted elements from the ‘Result’ section at the bottom.
- Just like Step 2, create another object ‘subscription2’ that subscribes to the same observable. Notice how the last emitted element is received by this subscriber.
- Attach DisposeBag object for cleanup as usual.
- Now, we have 2 subscribers for the same ‘behaviorRelay’ object. Notice how changes to the Observable are emitted to both the subscribers.
(D) Binding
‘bind(to:)’ in RxSwift is a vastly used operator to link the result of a value emitted from one Observable to another.
(E) Combine
Sequences can be combined and RxSwift provides a lot of operators out of the box.
Some of the interesting ones are ‘combineLatest’, ‘merge’, ‘zip’, ‘concat’. We will use only ‘combineLatest in our upcoming example, so, let’s look at how it works.
combineLatest
This operator is used to combine/take a set/ collection of Observables and provides us with a block to perform operations on those collections. It produces a single result out of the operations performed on the collections.
This is a simple marble diagram representing the same:
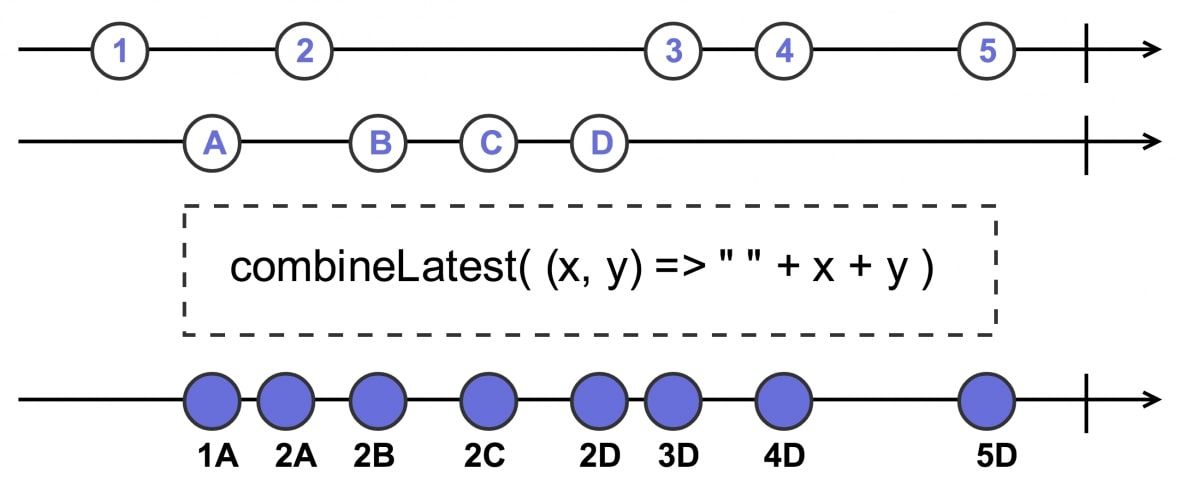
This might feel abstract for now but will soon be clear when we apply it to our example.
A word on RxCocoa
RxCocoa depends upon RxSwift and provides Cocoa-specific capabilities for general iOS development such as Binders. Basically, RxCocoa provides extensions to Cocoa & Cocoa Touch frameworks taking advantage of RxSwift.
For example, the user input event streams from the UI elements are provided to us by extending the RxSwift’s Observables.
We’ve so far done explored all the major concepts that we’re going to use in our example, which we’re going to develop next.
Example – Login Screen Implementation
Prerequisites
- Familiarity with Xcode
- Swift Basics
What are we building?
Most apps provide a Signup/ Login screen for user authentication. So, let’s try building a minimal version of a Login screen using the RxSwift library.
The requirements of the app are quite simple:
- Display 2 text fields for email & password respectively.
- Perform validation of user input data
- Enable the ‘Login’ button only when the data entered in both the fields is valid
Project Setup
Go ahead and create a project and put up a view controller class, if Xcode template didn’t add it for you by default.
Now, let’s design the login screen (ViewController) in the storyboard as shown below:

We basically have 2 text fields representing email & password inputs from the user. You need to have the IBOutlets to the text fields and button linked to ViewController.swift.
Your ViewController.swift file should look like this:
    @IBOutlet weak var emailTextField: UITextField!
    @IBOutlet weak var passwordTextField: UITextField!
    @IBOutlet weak var loginButton: UIButton!
Cocoapods Setup
Go ahead to initiate the pod setup for the project and add these libraries as dependencies to the project:
pod 'RxSwift'  // 1
pod 'RxCocoa'  // 2
Make sure to install these dependencies by running ‘pod install‘.
Import Dependencies
Import both these libraries in ‘ViewController.swift’ file:
import RxSwift
import RxCocoa
Data Validation Extensions
We want to perform validation on top of the user’s input from the text fields. So, we need to validate if the data contained in the first text field is a valid email and validate if the input contained in the second text field is a valid password.
Go ahead to paste the String extensions in a new file or the same ViewController.swift file:
extension String {
    /// Used to validate if the given string is valid email or not
    ///
    /// - Returns: Boolean indicating if the string is valid email or not
    func isValidEmail() -> Bool {
        let emailRegEx = "[A-Z0-9a-z._%+-]+@[A-Za-z0-9.-]+\\.[A-Za-z]{2,}"

        let emailTest = NSPredicate(format:"SELF MATCHES %@", emailRegEx)
        print("emailTest.evaluate(with: self): \(emailTest.evaluate(with: self))")
        return emailTest.evaluate(with: self)
    }

    /// Used to validate if the given string matches the password requirements
    ///
    /// - Returns: Boolean indicating the comparison result
    func isValidPassword() -> Bool {
        print("self.count >= 6: \(self.count >= 6)")
        return self.count >= 6
    }
}
‘isValidEmail()’: Verifies if the given string is a valid email address using the predicates
‘isValidPassword()’: Verifies if the given string is a valid password. Let’s keep our password requirements simple where we want the user to enter at least 6 characters.
ViewModel Creation
Let’s create a view model struct named ‘LoginViewModel’, which will hold the data: email & password entered by the user and will perform any kind of validation on top of them. You can place this struct either in a new file or in the same ‘ViewController.swift’ file:
//1
struct LoginViewModel {
//    2
    let email = BehaviorRelay<String>(value: "")
//    3
    let password = BehaviorRelay<String>(value: "")
//    4
    let isValid: Observable<Bool>

    init() {
//        5
        isValid = Observable.combineLatest(self.email.asObservable(), self.password.asObservable())
        { (email, password) in
//            6
            return email.isValidEmail()
                && password.isValidPassword()
        }
    }
}
Let’s go through each of the statements:
- Declaring a struct ‘LoginViewModel’
- Declaring BehaviorRelay object ‘email’ which will hold the values entered by the user into the email text field.
- Declaring BehaviorRelay object password which will hold the values entered by the user into the password text field.
- ‘isValid’ observer of type Boolean will hold the result of the validation operation performed on email & password text fields.
- We use the ‘combineLatest’ operator that we have learnt above. We pass in the email & password field observers to this operator.
- Inside the ‘combineLatest’ block we perform our validation operations. So, all our rules/ logic go here and it returns a boolean value indicating if the values entered are valid. It also assigns it to the ‘isValid’ object.
Controller Setup
Now, let’s allocate the ViewModel object for using it across the classes.
Put these lines of code inside the ViewController class:
let viewModel = LoginViewModel()  // 1
let disposeBag = DisposeBag() // 2- We simply allocate the LoginViewModel struct. Since we have written all of our configuration inside the ‘init()’ method, it should get triggered on the default instance creation and all Observables should be ready to use.
- Since we anyway need ‘DisposeBag’ instance for our Observers, let’s have it declared in a common place to use it with all observers.
viewDidLoad Setup
We are about to write the core part of the functionality.
Move to your viewDidLoad and add these lines:
emailTextField.rx.text.orEmpty.bind(to: viewModel.email)
.disposed(by: disposeBag)
So, here we are accessing the ‘emailTextField’ which is an outlet from our storyboard, using the dot operator:
‘rx’: We access the RxSwift ‘rx’ property that gives us the extension object of the text field
‘text’: We access ‘text’ on top of ‘rx’, which gives us the Reactive property of the text
‘orEmpty’: We need to call this since it converts the optional reactive ‘String?’ property to ‘String’, basically unwrapping it
‘bind(to:)’: As we saw earlier, passing any object to this method binds it to the property, so here we bind the emailTextField’s text property to the viewModel’s ‘email’ observable.
‘disposed’: Finally, we attach the disposeBag object for cleaning it up.
This single line of code does most of the magic here. It binds up the emailTextField’s text property to the viewModel’s ‘email’ observable so that any changes in the text field are simply emitted to this Observable.
Do the same for the ‘passwordTextField’, by pasting the line below line:
passwordTextField.rx.text.orEmpty.bind(to: viewModel.password)
.disposed(by: disposeBag)
This should set up the binding of the passwordTextField’s text property with the viewModel’s ‘password’ observable. So, any changes in the passwordTextField will be streamed to the ‘password’ observable.
We are now done with input validation. Let’s now work to make sure that the ‘loginButton’ is enabled only if the input is valid. To do that, let’s add the line of code shown below:
viewModel.isValid.map { $0 }
.bind(to: loginButton.rx.isEnabled)
.disposed(by: disposeBag)
‘map’: From our Functional Programming blog <<link to blog>>, we used ‘map’ to transform objects from one type to another. Here, we use it on viewModel’s ‘isValid’ Boolean Observable to transform it into a boolean. Basically, ’map’ transforms Observable to Bool type, which is then bound to the loginButton’s ‘isEnabled’ property which is then responsible for enabling or disabling the button.
In the above piece of code, we have linked the boolean value from viewModel’s ‘isValid’ property with the button’s ‘isEnabled’ property which makes the button enabled or disabled based on user input.
In order to verify if the button is tappable, try adding an IBAction and display an alert when the user taps on the login button so that you know if the button was enabled. Remember, the alert shouldn’t get displayed when the text field has wrong inputs entered into it.
Now, your ‘ViewController.swift’ should look like this:
import UIKit
import RxSwift
import RxCocoa

extension String {
    /// Used to validate if the given string is valid email or not
    ///
    /// - Returns: Boolean indicating if the string is valid email or not
    func isValidEmail() -> Bool {
        let emailRegEx = "[A-Z0-9a-z._%+-]+@[A-Za-z0-9.-]+\\.[A-Za-z]{2,}"

        let emailTest = NSPredicate(format:"SELF MATCHES %@", emailRegEx)
        print("emailTest.evaluate(with: self): \(emailTest.evaluate(with: self))")
        return emailTest.evaluate(with: self)
    }

    /// Used to validate if the given string matches the password requirements
    ///
    /// - Returns: Boolean indicating the comparison result
    func isValidPassword() -> Bool {
        print("self.count >= 6: \(self.count >= 6)")
        return self.count >= 6
    }
}

//1
struct LoginViewModel {
//    2
    let email = BehaviorRelay<String>(value: "")
//    3
    let password = BehaviorRelay<String>(value: "")
//    4
    let isValid: Observable<Bool>

    init() {
//        5
        isValid = Observable.combineLatest(self.email.asObservable(), self.password.asObservable())
        { (email, password) in
//            6
            return email.isValidEmail()
                && password.isValidPassword()
        }
    }
}

class ViewController: UIViewController {

    @IBOutlet weak var emailTextField: UITextField!
    @IBOutlet weak var passwordTextField: UITextField!
    @IBOutlet weak var loginButton: UIButton!

    let viewModel = LoginViewModel()
    let disposeBag = DisposeBag()

    override func viewDidLoad() {
        super.viewDidLoad()
        //        1
        emailTextField.rx.text.orEmpty.bind(to: viewModel.email)
            .disposed(by: disposeBag)
        //        2
        passwordTextField.rx.text.orEmpty.bind(to: viewModel.password)
            .disposed(by: disposeBag)

        //        3
        viewModel.isValid.map { $0 }
            .bind(to: loginButton.rx.isEnabled)
            .disposed(by: disposeBag)
    }

    @IBAction func loginButtonTapped(_ sender: Any) {
        let alert = UIAlertController(title: "Login", message: "Login Button Enabled/Tapped!", preferredStyle: .alert)
        let okAction = UIAlertAction(title: "OK", style: .default, handler: nil)
        alert.addAction(okAction)
        self.present(alert, animated: true, completion: nil)
    }

}
We have covered all the three requirements we specified for the app, however, it’s not a wrap yet.
In the above example, we used the most widely used pattern, View Model design pattern. If you would have noticed carefully, viewModel’s ‘isValid’ property merely acts as a bridge between the view model and controller. If we can remove this property and combine both the text field’s observables, it should remove the need for view model altogether.
The above implementation could be replaced with just 3 lines of codes described below without using the View Model pattern:
//1
let email = emailTextField.rx.text.orEmpty.asObservable()
//2
let password = passwordTextField.rx.text.orEmpty.asObservable()

//3
Observable.combineLatest(email, password) { (email, password) in
return email.isValidEmail()
    && password.isValidPassword()
}
.bind(to: loginButton.rx.isEnabled)
.disposed(by: disposeBag)
Let’s look into each of the statements:
- We declare a variable for email and assign the Observable accessed via ‘orEmpty’ transformator
- Similar to 1, we declare an Observable variable for password field
- We use the ‘combineLatest’ operator and add both the observables. So, if there are any changes in those observables, we get a callback to the block where we perform input validations and return a boolean indicating the operations’ result. In comparison with the previous approach, all we’ve done is: moved the “ ‘combineLatest’ + input validation “ from viewModel’s ‘init’ method to here and instead of assigning the result of the operation to ‘isValid’ property, we’ve directly linked it with the loginButton’s ‘isEnabled’ property.
And we are done! You can access the code for the entire project on github.
Conclusion
We delved into the basics of Reactive programming in this blog and I hope this serves as a starting point for you to explore both Functional and Reactive programming. You may like to explore other interesting concepts/ APIs like hot/ cold Observables in Reactive programming and the power of combining different functional programming HOFs.
As a next step, Ray’s book on Reactive Programming serves as a good starting point to learn and apply RxSwift. This github gist is a compilation of available iOS specific FRP resources.
Hope you enjoyed reading about FRP. Stay tuned for more interesting articles!
.jpg)

