
Hiring? Flexiple helps you build your dream team of developers and designers.
Building a Books Finder App using React and Redux

Mohan Dere
Last updated on
In our previous article, we looked at the value Redux adds to your React application and delved into the fundamental concepts in Redux. If you have not already read through it, I would strongly recommend you to do so before moving forward.
In this post, we will be building a “Books finder” app using React and Redux. Here is a brief outline of how we will go about this –
Table of Contents

Setup React app boilerplate
Let’s get started by creating our project called bookfinder-app using create-react-app boilerplate. Please run the following command on your terminal:
$ npx create-react-app bookfinder-app
You will see book-finder-app folder created with sample files and folders inside it. Please open it in your favourite editor.
Adding Redux
To install and add redux, run the command below –
$ yarn add redux
Configure store
The next step is to store the configuration. Let’s create the file src/configureStore.js file with the following code:
import { createStore } from 'redux'
import createRootReducer from './reducers'
// Define on your own as per requirement
const preloadedState = {};
// Create store
const store = createStore(  createRootReducer(), // root reducer with router state
preloadedState)
export default store;
Here we have imported and called Redux’s createStore function with 2 parameters
– A root reducer and a preloaded/ initial state.
The following section talks more about the root reducer. Preloaded state is the initial state of the entire application. We can optionally hydrate the state from the server in universal apps or we can restore a persisted state (for example, previously serialized user session).
Create root reducer
Combining reducers throughout app will effectively result into a root reducer.
Consider the example below where we have combined reducers from two modules using Redux’s combineReducers function.
const rootReducer = combineReducers({ module1: module1Reducer, module2: module2Reducer})
To create one for our application, add a new file called rootReducer.js under src folder with the following code:
// src/rootReducer.js
import { combineReducers } from 'redux'
// Import module specific reducers here and combine them
// For now keep it empty, will add  them soon
const createRootReducer = () => combineReducers({
  // Your reducers will go here
});
export default createRootReducer;
Here we have exported the createRootReducer function which will be called while creating the store.
Configure routes
It’s now time to think of the pages/screens that will be a part of our application. We will start with mocks from our designer. In our case you can browse this demo site.
Our bookfinder app will have two pages/screens – home and book. Let’s add a folder for each screen under src as shown below:
/src
- /screens/home/book
- /home
- /book
- …
Next, we will configure the routes corresponding to the above screens. For routing in React, we will use the React router library.
To install React Router, run the command below:
$ yarn add react-router-dom
We will then create the routes.js file under src directory with the following code:
// src/routes.js
import React from 'react';
import { Route, Switch } from 'react-router-dom';

// Screens
import Home from './screens/home';
import Book from './screens/book';

export default (
  <Switch>
    <Route exact path="/" component={Home}/>
    <Route path="/book/:ID" component={Book}/>
  </Switch>
);
Next, we need the Home and Book components to get the above code to work.
To add them, put index.js file under src/screens/home and src/screens/book directory with the content shown below:
//src/screens/home/index.js

import React from 'react';
import './home.css'

const Home = () => (
  <div id="home" className="page">
    <div className="container">
      content will go here...
    </div>
  </div>
)
export default Home;
//src/screens/book/index.js
import React from 'react';
import './book.css'
const Book = () => (
<div id="book" className="page">
<div className="container">
content will go here...
</div>
</div>
)
export default Book;Structure the app
We will begin with the home screen by adding some boilerplate code. Let’s add the following files and folders under src/screens/home/ directory.
- /screens/homeactionTypes.jsactions.jsreducers.js/containers/componentshome.cssindex.js
- …
Before heading over to writing actual code, it would make sense to think and break down our UI into components and design UI hierarchy. This process of breaking down the UI is not a part Redux or to be more accurate, it is not particularly bound to any JS framework. You can apply this technique anywhere while building any UI. Let’s begin by examining the home page layout first and think about the individual components.
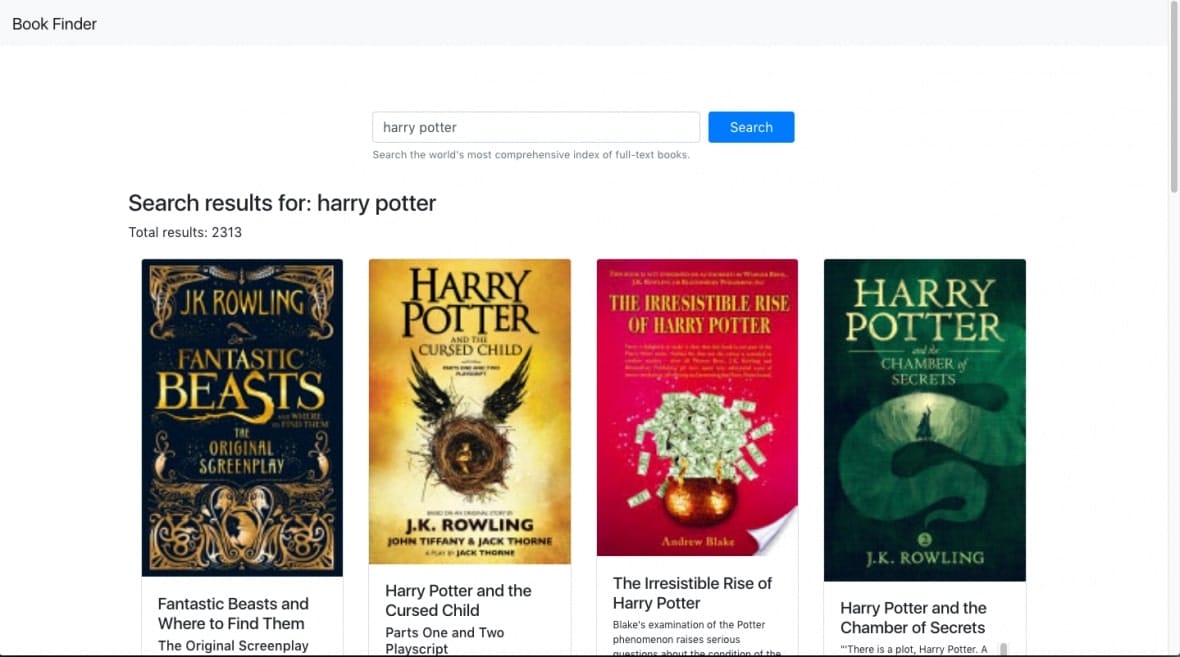
Our design brief is simple – when a user types in the search input, we want to show a list of book items which matches the input. We would also like to show some additional information like total results.
The components would then be:
- Search – Search input form
- Info – Seached keyword and total results
- Books – List of booksBookCard – Movie card with image, tile, description etc
Presentational components describe the look and are not concerned with where the data comes from or how to change it. They only render what’s given to them and have no dependency on Redux.
In our app, the following can be presentational components:
1. Info
2. BookCard
We will also need some container components to connect the presentational components to Redux. Container components are often stateful, as they tend to serve as data sources. They are concerned with how things work. Also, they are responsible to provide data and behaviour to presentational or other container components.
Following are the container components for our app:
Search – Takes user input and updates the store so that other components can use it
Books – Responsible for querying data from book results based on user input and rendering BookCard
Adding the above components, our final home page folder structure will look like this:
- /screens/homeactionTypes.jsactions.jsreducers.js/containersSeach.jsBooks.jsInfo.js/componentsBookCard.jshome.cssindex.js
Binding Redux to React and Providing store
Now that our store is ready, it’s time to connect it to our React application. For this purpose, we will use the official react-redux package. Let’s install it first through the following command:
$ yarn add react-redux
Note: Check the official React-Redux docs at https://react-redux.js.org for a complete guide on how to use Redux and React together.
React Redux provides <Provider />, which makes the Redux store available to the rest of your app, which is the higher-order component that consumes the store.
// src/App.js

import React from 'react';
import { Provider } from 'react-redux'
import store from './configureStore';
import './App.css';

function App() {
  return (
    <Provider store={store}>
      <div className="app">
        Hello world!
      </div>
    </Provider>
  );
}
export default App;
React Redux also provides a connect function for you to connect your component to the store. We will see its usage in the later sections.
Implement Components
Technically as we discussed earlier, we divides all components into 2 category: Presentational and Container. There are several benefits of this approach such as
- Better reusability – We can use the same presentational component with completely different state sources.
- Better separation of concerns – We can understand our app and our UI better by writing components this way.
We will begin with the presentational components so that we don’t have to worry about binding to Redux yet. We will write functional stateless components unless we need to use local state or the lifecycle methods.
// src/screens/home/components/Info.js

const Info = ({query, totalItems}) = {
  return (
    <>
    <h3>Search results for: {query}</h3>
    <p>Total results: {totalItems}</p>
    <>
  }
}
export default Info;
// src/screens/home/components/BookCard.js
import React from 'react';
import { Link } from 'react-router-dom';
import Card from 'react-bootstrap/Card'
const BookCard = ({ book }) => {
let {
title,
subtitle,
imageLinks,
description
} = book.volumeInfo;
return (
<div className="book">
<Card>
{imageLinks
? <Card.Img variant="top" src={imageLinks.thumbnail} />
: null
}
<Card.Body>
<Card.Title>{title}</Card.Title>
<Card.Subtitle>{subtitle}</Card.Subtitle>
<Card.Text className="book--description">{description}</Card.Text>
<Link className="book--link" to={`/book/${book.id}`}>View</Link>
</Card.Body>
</Card>
</div>
)
}
export default BookCard;It’s now time to hook those presentational components to Redux by creating some containers.
Technically, a container component subscribes to a part of the Redux state tree and supplies props to a presentational component it renders.
As Redux is framework agnostic, we use react-redux whose sole purpose is to seamlessly integrate redux’s state management into a React application.
We use React Redux library’s connect() HOC to connect our component to Redux store.
To use connect(), we need to define a pure function called mapStateToProps that describes how to transform the current Redux store state into the props we want to access in our container component. It receives the entire store state and should return a data object this component needs. It also gets called every time the store state changes. Effectively, in this function, we are selecting the part of data from the store that the connected component needs.
Let’s create our first container component “Search” for a better understanding of connect()
// src/screens/home/containers/Search.js
import React from 'react';
import { connect } from 'react-redux'
import Form from 'react-bootstrap/Form'

const Search = ({query}) => {
  const handleOnSubmit = (e) => {
    e.preventDefault();
  }
  return (
    <div className="search-books">
      <Form className="search-books--form" onSubmit={handleOnSubmit}>
        <Form.Group>
          <Form.Control type="text" placeholder="Harry Potter, Food and Love" value={query} />
          <Form.Text className="text-muted">
            Search the world's most comprehensive index of full-text books.
          </Form.Text>
        </Form.Group>
      </Form>
    </div>
  )
}

const mapStateToProps = state => {
  return {
    query: state.books.query
  }
}

export default connect(
  mapStateToProps,
  null
)(Search);
In the above snippet, Search is a functional component receive props holds query parameter.
On line 6, we’ve extracted query from props and passed it as value to our input field.
On line 24, the mapStateToProps function receives the entire Redux state tree and returns a new object derived from a part of the state tree.
On line 30, we’ve exported the component returned by connect(). The 2nd parameter to connect can be either null or mapDispatchToProps. For now, don’t worry about the mapDispatchToProps function and its usage. We will explore it soon.
So far, we have understood how to read a part of Redux’s state tree. Now, it’s time to understand how to set/ update the Redux state in parts.
From the above code, you may have noticed that we didn’t bind any on change handler for the input field as of now. To keep user typed value in sync with our store, we must update it as soon as user types anything. This is where mapDispatchToProps comes into play.
Let’s modify the above code as follows:
// src/screens/home/containers/Search.js
import React from 'react';
import { connect } from 'react-redux'
import Form from 'react-bootstrap/Form'
import { getBooks } from '../actions'

const Search = ({query, onInputChange}) => {
  const handleOnSubmit = (e) => {
    e.preventDefault();
  }
  return (
    <div className="search-books">
      <Form className="search-books--form" onSubmit={handleOnSubmit}>
        <Form.Group>
          <Form.Control
            type="text"
            placeholder="Harry Potter, Food and Love"
            onChange={(e) => onInputChange(e.target.value)}
            value={query}
          />
          <Form.Text className="text-muted">
            Search the world's most comprehensive index of full-text books.
          </Form.Text>
        </Form.Group>
      </Form>
    </div>
  )
}

const mapStateToProps = state => ({
  query: state.books.query
})
const mapDispatchToProps = dispatch => ({
  onInputChange = (query) => dispatch(getBooks(query))
})

export default connect(
  mapStateToProps,
  mapDispatchToProps
)(Search);
The only way to update data in your store is to dispatch actions. As the second argument passed to connect, mapDispatchToProps is used for dispatching actions to the store.
mapDispatchToProps lets us create functions that dispatch when called and pass those functions as props to our component. This means it allows us to specify which actions our component might need to dispatch.
In the above example, we have injected a prop called onInputChange in the Search component which dispatches the action getBooks with query as the parameter.
Note: Check out Redux’s bindActionCreators function which binds action creators (action creator is a function that creates an action) to dispatch
Implementing Actions
Let’s now go ahead to create the getBooks action. This action will receive query as a parameter. Since we are fetching data from the server over Ajax, we need to define getBooks as async action.
// src/screens/home/actionTypes.js
export const REQUEST_BOOKS = 'REQUEST_BOOKS'
export const RECEIVE_BOOKS = 'RECEIVE_BOOKS'
// src/screens/home/actions.js
import axios from 'axios'
import {
REQUEST_BOOKS,
RECEIVE_BOOKS
} from './actionTypes'
// This action will be called before request start
export const requestBooks = (query) => ({
type: REQUEST_BOOKS,
query
})
// This action will be called when request complete
export const receiveBooks = ({status, payload }) => ({
type: RECEIVE_BOOKS,
status,
payload
})
export const getBooks = (query) => {
return function (dispatch) {
dispatch(requestBooks(query));
const url = `https://www.googleapis.com/books/v1/volumes?q=${query}`
return axios.get(url)
.then(response => {
dispatch(receiveBooks({
status: 'success',
payload: response.data
}))
})
.catch(error => {
dispatch(receiveBooks({
status: 'error',
payload: error
}))
})
};
}With a plain, basic Redux store, you can only perform simple synchronous updates by dispatching an action. Middleware let you write async logic that interacts with the store. Redux Thunk middleware is the recommended middleware for Redux side-effects such as AJAX requests. Effectively, Middleware lets you wrap the store’s dispatch method for us.
To get the above code to work, let’s install Redux thunk middleware:
$ yarn add redux-thunk
And modify our src/configureStore.js file to install middleware:
// src/configureStore.js
import { createStore, applyMiddleware } from 'redux'
import thunk from 'redux-thunk';
import createRootReducer from './reducers'

// Define on your own as per requirment
const preloadedState = {};
// Create store
const store = createStore(
  createRootReducer(), // root reducer with router state
  applyMiddleware(thunk),
  preloadedState
)
export default store;
Designing Store
Our next to-do is to design our store states. On the homepage, we are querying books based on the user type. Our request can either be in progress or may be completed with success or failure. Our state can look like:
- query – User input that can be used by Info and Books components
- data – Books API response
- isFetching – State of network request – if it is in progress or completed
- error – If the request fails, the error received from server will be shown
state = {
  books: {
    query: '',
    isFetching: false,
    data: {},
    error: ''
  },
  ...
}
Implementing Reducers
You would recollect that actions only describe what happened, but don’t describe how the application’s state changes. It’s the Reducers job to specify how the application’s state changes in response to the action.
// src/screens/home/reducers.js

import { REQUEST_BOOKS, RECEIVE_BOOKS } from './actionTypes'
const initalState = {
  query: '',
  isFetching: false,
  data: {},
  error: ''
}

export const books = (state = initalState, action) => {
  switch (action.type) {
    case REQUEST_BOOKS:
      return Object.assign({}, state, {
        isFetching: true,
        query: action.query
      })
    case RECEIVE_BOOKS:
      return Object.assign({}, state, {
        isFetching: false,
        data: action.status === 'success' ? action.payload : initalState.data,
        error: action.status === 'error' ? action.payload : initalState.error
      })
    default:
      return state;
  }
}
Redux executes all the reducers when an action is dispatched. This is why we are adding conditional state update logic in response to specific action type. Our books reducer should only update state of dispatched actions that have the type REQUEST_BOOKS or RECEIVE_BOOKS. Otherwise it should simply return the existing state.
Further, we will import and combine this home/reducers.js in our rootReducer.js file to form our state.
    import { combineReducers } from 'redux'
    import { connectRouter } from 'connected-react-router'

    // Import your module reducers here and combine them
    import { books } from './screens/home/reducers'

    export default (history) => combineReducers({
      router: connectRouter(history),
      // Rest of your reducers
      books
    });
As a result, our first state is ready to use.
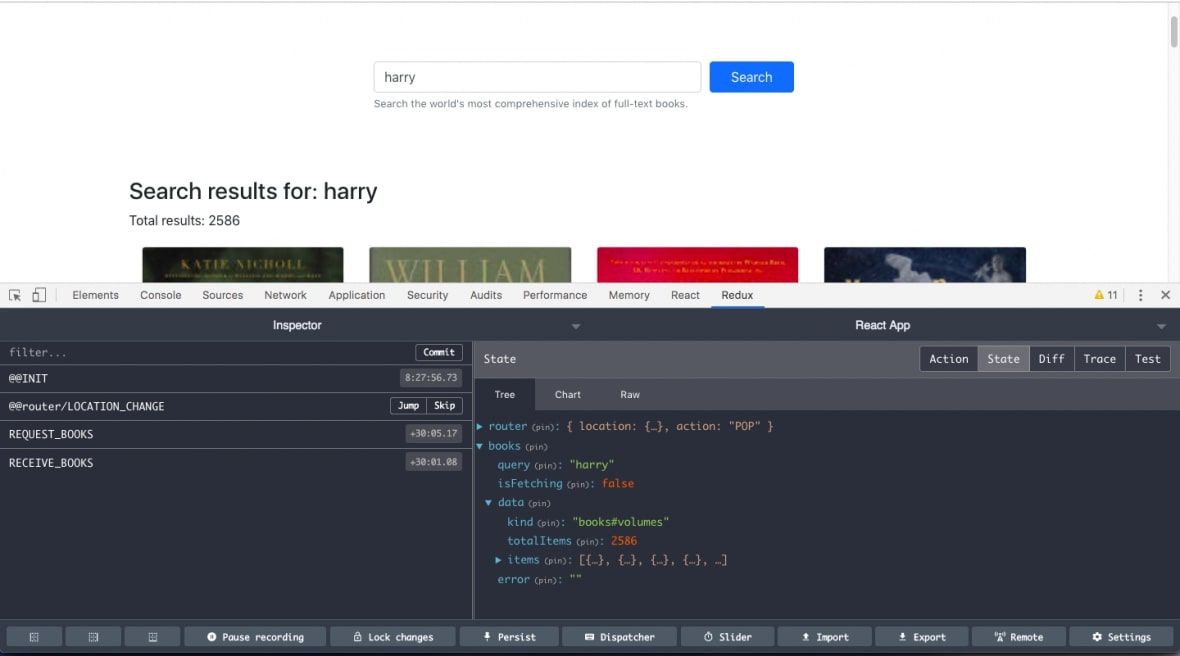
- Note: You can install Redux DevTools extension to debug your app current state, to perform time travel etc.
Consuming state
We now have the latest data in store and it’s time to use it.
Let’s create the Books component which will receive the updated state. Books will be the container component which listens to the above state change. To consume the state, we will connect our component to the store and implement mapStateToProps as shown below:
import React from 'react';
import { connect } from 'react-redux';
import isEmpty from 'lodash/isEmpty'

import BookCard from '../components/BookCard'

const renderBooksList = (data, query) => {
  if (isEmpty(data)) {
    return null;
  }
  let { items: books, totalItems } = data;
  return (
    <>
      <h3>Search results for: {query}</h3>
      <p>Total results: {totalItems}</p>
      <div className="books-list">
        {books.map(book => <BookCard key={book.id} book={book} />)}
      </div>
    </>
  )
}

const Books = ({ data, isFetching, query, error }) => {
  let jsxStr = ''

  if (isFetching) {
    jsxStr = <p>Loading...</p>
  } else if (!isEmpty(error)) {
    jsxStr = JSON.stringify(error)
  } else {
    jsxStr = renderBooksList(data, query);
  }
  return (
    <div className="books">
      {jsxStr}
    </div>
  )
}

const mapStateToProps = (state) => {
  let { data, isFetching, query, error } = state.books
  return {
    data,
    isFetching,
    query,
    error
  }
}

export default connect(
  mapStateToProps,
  null
)(Books);
In the above code snippet, we are passing the second parameter mapDispatchToProps of connect as null since we are only using it to store data and not dispatch any actions.
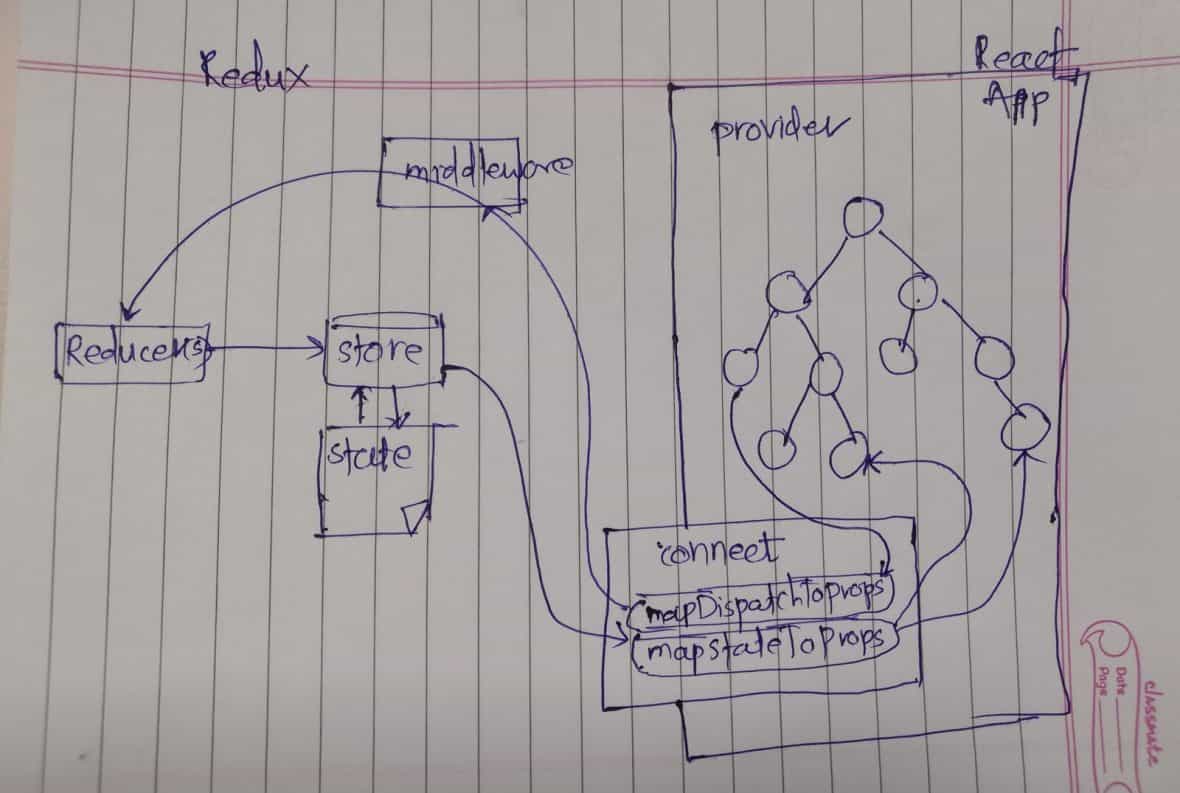
I hope you now have a much clear picture on how Redux is used in React applications. Here is a diagram that explains the same:
Finishing the app
So far we’ve developed the home screen and the implementation of the book details screen will look similar. I will leave it to you to implement the book details screen. You can access the complete code for the app here.
Here are a few more details to help you out.
The routes we’ve defined earlier are –
- home – /
- book details – /books/:ID
You can then start by modifying /src/screens/book/index.js. In our store, we’ve the search query element which displays results for books. All you have to do is connect this component to the Redux store to access books and then filter books with the passed ID in the url. You can get this ID from the props.match.params object provided by React router and finally show those details in the UI.
You may also think about fetching book details from the server instead of using the store.
Conclusion and Next Steps
In our discussion, we didn’t touch upon Time Travel which is a powerful feature of Redux. We would strongly advise you to go through it and use it to your advantage.
To give a brief idea, Time Travel is the ability of Redux to move back and forth among the past states of an application and inspect the results in real time without reloading the page or restarting the app. For time travel in React-Redux apps, you can add the connected-react-router library which provides binding between our redux app & react-router and it keeps them in sync.
In conclusion, Redux is a powerful tool and even more so, when combined with React. It really helps to know why each part of the react-redux library is used and I am hoping that you are clear on the function/ usage of Provider and connect after reading this post. Waiting to see Redux integrated (the right way) in your next React app 🙂
We work with skilled front-end developers to build amazing products. Do check out our services.


