
Hiring? Flexiple helps you build your dream team of developers and designers.
Basics of Flutter Animations – Tweens and Animation Controllers

Deven Joshi
Last updated on
Animations are an essential part of making the UI of a mobile application feel natural and smooth to the user. Smooth transitions and interactive elements make an app pleasant to use. On the other hand, badly made animations can make the app look clumsy or worse, break the application altogether. For this reason, learning the fundamentals of animations in any framework is an essential step towards delivering a superior user experience.
Flutter animations are a powerful aspect of the framework. The Flutter Gallery app itself displays some amazing app demos made with Flutter.
In this article, we will look at the fundamentals of creating a flutter animation. The great thing about going through these fundamentals is that the structure stays the same even across most complex animations and learning this structure will give us a pathway to creating amazing user interfaces.
Table of Contents
- Understanding the structure of a Flutter application
- Tweens and their uses
- Animation Controllers
- Creating a simple Flutter animation
- Creating a project
- Basic Code setup
- Setting up AnimationControllers and Animations
- Building the box
- Starting the animation
- Rebuilding the box on animation value change
- Adding curves for a better look
Understanding the structure of a Flutter application
Flutter constructs an application in a different way than an Android or iOS app. Here, all elements (TextField, AppBar, Text, etc.) are fundamentally the same. The underlying rule is:
Everything is a Widget
Every component is either a Stateful or Stateless Widget. A Widget is just a component we can render on the screen (there are exceptions to this rule, but the definition works for most cases).
Every app consists of a widget tree which displays the hierarchy of components inside the app.
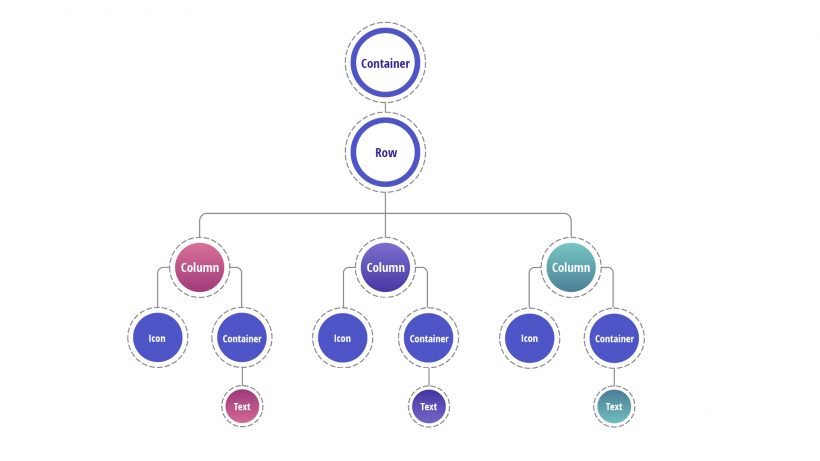
A widget tree helps us to see how widgets rebuild in a tree. All widgets in the tree are IMMUTABLE. Their properties cannot change, rather Flutter prefers rebuilding them. This is an inexpensive operation in Flutter since the state is separated from the widget itself.
Essentially, when we change a widget, e.g. when animating the color change of a simple box, we have to tell Flutter that we need to rebuild the box to show our change. We can rebuild in Flutter by calling a function called setState().
We will now move to understanding the basics of animation assuming you already have some experience programming in Flutter. If not, flutter.dev is a good place to start.
Tweens and their uses
Tweens are one of the most critical concepts in Flutter animations or in other words, to animating anything in Flutter.
Tweening stands for inbetweening. To understand what that means, look at the image below:
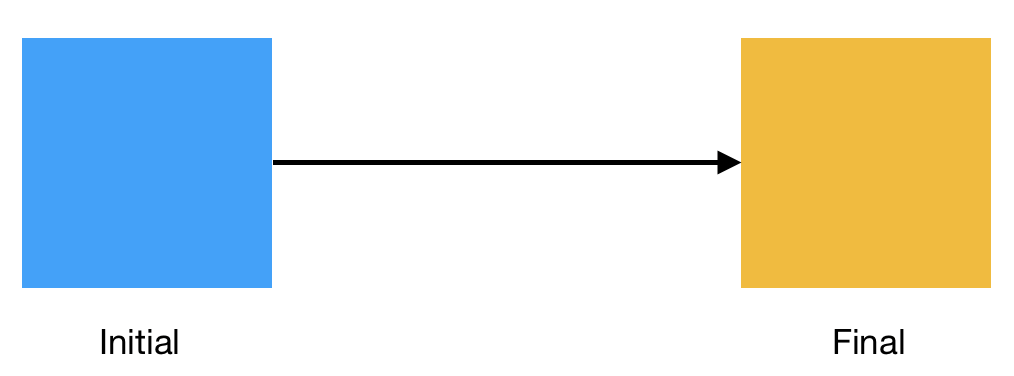
We have a box with a blue background initially and we need to animate it to change the color to yellow. Now, an abrupt color change looks terrible to the user. The change has to be smooth. However, it is impossible for us to show all colors that lie between. In such cases, we create a ColorTween, which gives us all the values in between (between -> tween) blue and yellow so that we can display them.
Simply put, a Tween gives us intermediate values between two values like colors, integers, alignments and almost anything you can think of.
The widget does not need to get the value from the tween directly. A tween is provided to the animation itself which gives us correct values at the right time.
In Flutter, you can define the tween as Tween<T> or use predefined classes like ColorTween which are specifically designed for this.
Animation Controllers
An animation controller is, as the name suggests, a way to control (trigger, fling or stop) an animation.
However, the main function of the controller is to drive the animation. This means it will cause the animation to change its value and return a new value from the Tween based on the progression of the Animation.
Every Flutter animation needs at least two elements to be created:
- A Tween to get generate values for the animation
- An AnimationController as parent
An AnimationController gives the progression of the animation from 0 to 1 whereas the Animation gives the actual tween value expected by the widget.

Animation controllers need to be disposed off once the navigation is complete.
The AnimationController also gives us control over how the animation behaves. For example, we can repeat an animation using controller.repeat().
Note, however, that the Flutter animations we create are not tied to a specific object but rather, any widget in the hierarchy can use it as the need be.
That’s it! You now have a good understanding of the basic components. Let’s dive right in to creating our own animation then!
Creating a simple Flutter animation
Here is what we will create as our first Flutter animation:
(TL;DR: Show me the code)
At the center, there is a Container widget that has two simultaneous animations: a color change and size change.
Let’s start by creating a Flutter project
Creating a project
To create a project, go to File -> New -> Flutter project and select Flutter application.
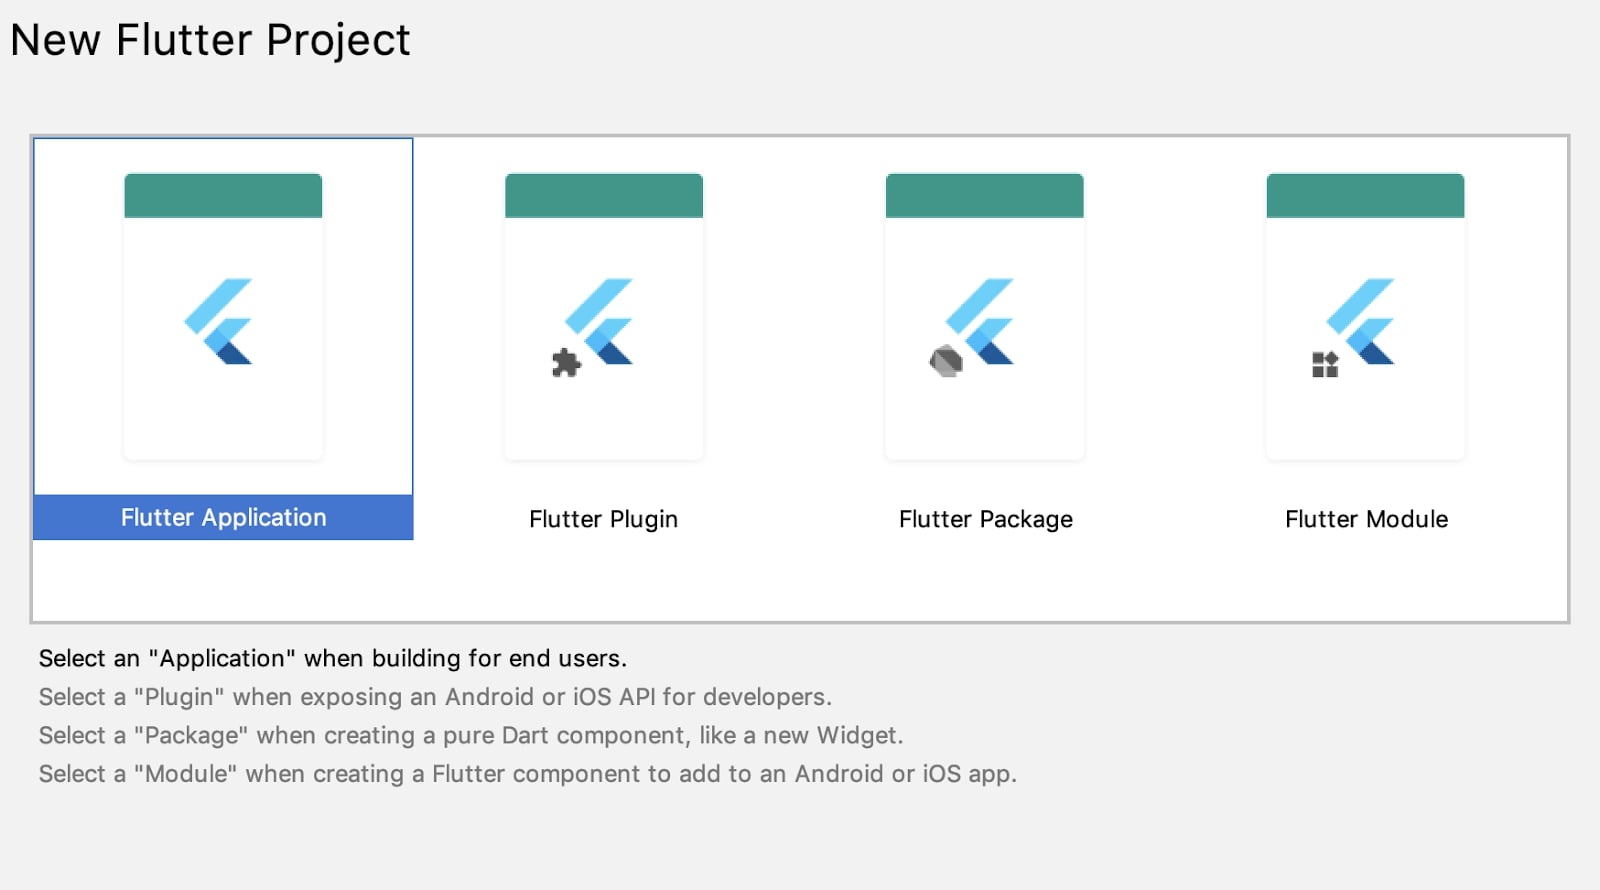
Leave everything else to default and click finish.
Basic Code setup
Let’s delete the code from main.dart and paste our starter code shown below:
import 'package:flutter/material.dart';

void main() => runApp(MyApp());

class MyApp extends StatelessWidget {
 // This widget is the root of your application.
 @override
 Widget build(BuildContext context) {
   return MaterialApp(
     title: 'Flutter Demo',
     theme: ThemeData(
       // This is the theme of your application.
       //
       // Try running your application with "flutter run". You'll see the
       // application has a blue toolbar. Then, without quitting the app, try
       // changing the primarySwatch below to Colors.green and then invoke
       // "hot reload" (press "r" in the console where you ran "flutter run",
       // or simply save your changes to "hot reload" in a Flutter IDE).
       // Notice that the counter didn't reset back to zero; the application
       // is not restarted.
       primarySwatch: Colors.blue,
     ),
     home: MyHomePage(),
   );
 }
}

class MyHomePage extends StatefulWidget {
 @override
 _MyHomePageState createState() => _MyHomePageState();
}

class _MyHomePageState extends State<MyHomePage> {
 @override
 Widget build(BuildContext context) {
   return Scaffold(
     appBar: AppBar(
       title: Text("Animation Demo"),
     ),
   );
 }
}
This gives you just a blank screen with an AppBar:
-7rnx6.png)
Setting up AnimationControllers and Animations
We need to define our animations and controller to control the animations.
Before we do this, we need to add a mixin to our class for vsync for the AnimationController.
class _MyHomePageState extends State<MyHomePage> with
SingleTickerProviderStateMixin {
This mixin provides ‘ticks’ for the controller to change values over time.
If you are unfamiliar with mixins, check this explainer article.
Finally, we set up our animation controller and animations as follows:
AnimationController controller;
Animation colorAnimation;
Animation sizeAnimation;

@override
void initState() {
 super.initState();
 controller =  AnimationController(vsync: this, duration: Duration(seconds: 2));
 colorAnimation = ColorTween(begin: Colors.blue, end: Colors.yellow).animate(controller);
 sizeAnimation = Tween<double>(begin: 100.0, end: 200.0).animate(controller);
}
initState() is the first function that runs when building a widget. Here, we initialise our variables.
For the controller, we pass in the vsync parameter, which is given by the SingleTickerProviderStateMixinwe added to the State class. We have also set the duration of the animation to 2 seconds.
Next, for this animation, we will be using Tweens we discussed earlier.
First, let’s create a Tween. For color, this is:
ColorTween(begin: Colors.blue, end: Colors.yellow)This creates a tween which starts from blue and ends in yellow and will give us all colors in between. To create an animation out of it, we use the animate() method on it, passing in our AnimationController. We will do this for sizeAnimation animation as well, where we start with a size of 100.0 and end with 200.0.
Building the box
To create a box, we can use the Container() widget by setting height, width and color.
@override
Widget build(BuildContext context) {
 return Scaffold(
   appBar: AppBar(
     title: Text("Animation Demo"),
   ),
   body: Center(
     child: Container(
       height: sizeAnimation.value,
       width: sizeAnimation.value,
       color: colorAnimation.value,
     ),
   ),
 );
}
We can get the current value of the animation simply by {animationName}.value. We have also added the Center widget to center the box on the screen.
Starting the animation
To start an animation, we can use the controller we defined earlier as it controls all animations tied to it. The simplest way to do it is controller.forward() and to reverse, controller.reverse().
However, the controller also gives us other options like controller.repeat() which repeats the animation continuously and controller.fling() which flings (runs an animation quickly regardless of duration) the animation.
If you run the animation now, it will not work since we are not rebuilding the box when the animation values change. Running the app results in it being stuck here:
-nqjn8.png)
Rebuilding the box on animation value change
As mentioned earlier, we use the setState() function to rebuild the box. The question, however, is when do we rebuild the box? Is it before, during or after the animation?
We want to rebuild the animation when the progression value changes (animation goes a step ahead).
The AnimationController is responsible for keeping track of the progress of the animation. We can use it to know when the animation updates.
To do this we will simply add a listener to the controller and rebuild on change.
// In initState
controller.addListener(() {
 setState(() {});
});
And we’re done!
You can find the code for the complete example here.
Go ahead to experiment with various Tweens to create new kinds of Flutter animations.
Adding curves for a better look
In our animation, you would have noticed that linearly increasing the size or changing color doesn’t look very impressive to the user. To improve upon this, we can add curves to our animation. Curves change how the animation value changes over time, making it faster and slower over a duration leading to a better look.
To add a curve, simply add a CurvedAnimation instead of adding the controller while initialising the animation.
colorAnimation = ColorTween(begin: Colors.blue, end: Colors.yellow)
      .animate(CurvedAnimation(parent: controller, curve: Curves.bounceOut));
GIST: https://gist.github.com/deven98/0a655048d1f20a0dd86591e614159c98
This gives us a bouncy effect when the animation is ending:
That’s all folks! We have a follow-up article on advanced flutter animations where we build upon our newly gained knowledge to create complex animations. Read on to know more!


